Tuesday, September 21, 2021

Finished product-Except for some mods.

 So I finished the project. I was able to install the windows, wiring harness, all the fenders, hood, trunk and assemble it good as new. 


Some issues I've overcome:

Needed new:

Fuel pump

Coil

Distributor

alternator

Brake lights did not work. The lights were on all of the time, EXCEPT when I pumped the brakes. I had the switched wired wrong. 

Car died during night test drive. I found out that the alternator is dependent on the warning light in dash. I replaced the bulb and fitting and it worked properly.

Some issues yet to overcome:

Driver's door does not fit. I misjudged the height of the door top from the top of the heater channel. I put shims in to make up the 1 inch difference. My plan is to drive the car and have some fun until winter. Then I'll cut the difference and get the door sized right.

Now for some modifications:

Install drop spindles and front disc brakes

Weld in trim holes. I do not want to install trim and want more of the shaved look.

Tuck bumpers in

Add horsepower to original engine.


More to follow.

Wednesday, April 21, 2021

Getting Back To the Project

 It's been 5 years since I've posted and that's because I took a long break from the project. I'm an author and I needed to focus on writing books, podcasting and marketing; then there was the ultra-running goals.  If you want to find out more about what I'm involved in visit: https://www.redbikepublishing.com  https://www.jeffreywbennett.com https://www.bennettinstitute.com.

i almost sold her and the person who was going to buy it would use her for parts. Great plan, but I just didn't feel right about it. I felt I could finish and needed the right motivation. I've decided to focus the time and attention needed to put this crazy bug back together. I want my children to learn to drive a stick shift, see their dad finish a project, and drive this classic around. These are great goals and motivation that I need to finish.

Since starting the project I've learned to many new things including  welding, metal work and problem solving. I mean 40-50% of the car has new metal where rusted out components prevailed. I'm no pro, but am satisfied with the daily driver this will become. I was trying to make a show car, but lack of experience hit me like a freight train. I thought  I could finish this in a few months and watching tv shows and youtube did not provide the right story. This takes many, many hours beyond a few months. My wife was getting fed up with this failed project and the neighbors were beginning to talk. Have you noticed that many tv shows are including the amount of hours the projects are taking, lol.

So my plan is to put her together with new wiring, seals, and showing off all of her scars. My car will only have top coating and no pain. With that declaration, I can now put it together. My father told me to keep it simple, and I'm following that advice. 

I decided to start the engine:


Once it started, I could move forward.


Now that it would start, I could put the body back on the chassis. I was expecting a huge amount of work, but I got a few friends together and it took a few seconds. I used four really long bolt (10mm) as guides to settle the body in the right place.


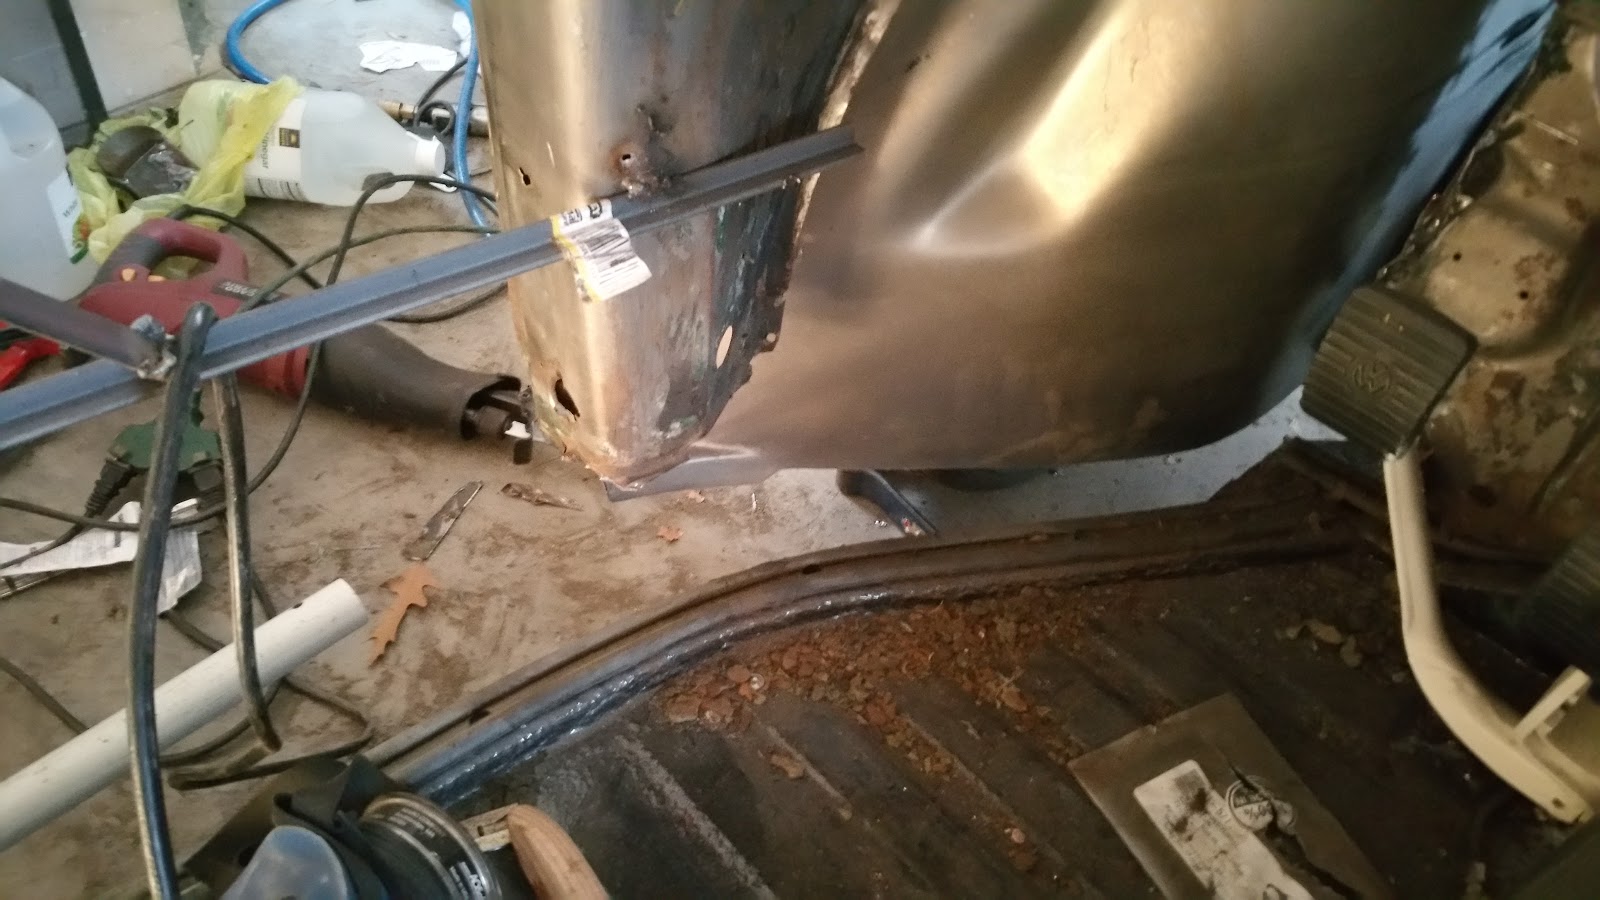
I forgot to weld on the right wheel well support, so I did it after the body was mounted. It turned out pretty good. Once done, I repainted all of the under surfaces with undercoating.


I had to order a new part. It's the left side heater part.


Now, all of these parts are awaiting installation.

Friday, January 1, 2016

Installing the front left vw beetle quarter panel part 1.

One of the most challenging of operations is the removal and installation of the front left quarter panel. My bug had been crashed so many times by previous owners that it had no more shape to it. I tried to correct it with bondo, then gave up. 

The first task is to drill out the old spot welds around the front apron, sides, and front cross beam (fire wall) and heater channel. Then you have to unfold the metal around the door. I found that if I cut cross wise above the quarter panel fold, I could chisel the fold down the length of folded metal. That worked.

This is the folded metal. Cut a slit across the fold just above the quarter panel. Then pry the fold open.

This is what the pried open fold looks like. The old metal will slide right out.


I ordered a new panel and began removing the old pane. I drilled out old spot welds and ground out large pieces of metal until all was gone. I pried the rest out and once finished, began prepping the new piece to fit.

 Trying to fit the quarter panel to the front apron and the door post metal fold is difficult. I decided to tackle spot welding to the front apron first. I called my dad to help and thankfully he was available. As I welded he pushed in the quarter panel flush with the front apron. We used pot holders to disperse the heat from the mig welder.

New quarter panel spot welded to the front apron

Spot welds inside the front apron


The fold is straightened and the new sheet metal should fit in.


FItting in the VW Beetle Heater Channel Part 1

 Removing the old rusted out heater channel took a while. I bought a new heater channel with all components as a unit. It fit very well. After drilling out the spot welds, prying and grinding, I pulled out the old stuff piece by piece. I decided to put the body back on the chassis so that there would be less of a chance for the body to warp or fold. That worked out pretty well until I tried to put in the new channel. It just wouldn't fit with the gas,brake, and clutch pedals in the way. I finally lifted the back end off the chassis and put it on a saw horse. I finally had enough room to bolt the new channel to the chassis. Once securely bolted in, I lowered the chassis. I'll weld it in later after I replace the cross beams. They are pretty rusted out as well.

Try as I might, I couldn't get the new channel in.


I lifted the rear of the body off the chassis. Finally enough room.


I bolted the new heater channel to the chassis and lowered the body to the heater channel.


Heat channel fits, just have to finish welding in the new front left quarter panel


New channel fits like a dream.


Look at that


Removing the VW Beetle Heater Channel and Related Sheet Metal

Cut out an old section above the heater channel. I've got  the replacement sheet metal and will fix it later.

Working on the VW Beetle is going waaaay slower than the impression I get from those great car shops on the Velocity channel. Those guys can do way more in 30 minutes than I can do. Anyway, sorry so long without posting, but life got in the way. I did not abandon the work, it just took a while to do anything that anyone would notice. 

So far, I've cut out a little bit of rusted metal, welded in some fender receiver bolts and strategized how I would replace new metal. I've had a welder breakdown as well and spent a few weeks waiting for a replacement. I also ordered new parts and prepared them for welding. 

The new parts arrive with a protective coating. I always remove this coating by painting on aircraft removal chemicals. This is an easier method than grinding with a wire wheel. Once the protective coating is removed, you can apply some primer to protect the metal until you are ready to weld it. I also used POR-15  to protect the inside (parts unseen when welded back to the car).

This piece has POR-15 on the inside to fight future rust. It will go in the cut out area of the picture above.

This is the outside piece that will be primered and painted.

This week I had a great opportunity to get back to work and make some recognizable headway. I drilled out old spot welds and chisled out the remaining metal. This is hard work that takes a lot of time. I removed the left front quarter panel and the left heater channel. I  prepped the replacement pieces and braced the VW with pig iron from Tractor Supply. If you don't brace the doorway, the car could fold when the heater channel is cut out.


Will have to replace the crossbeam and end of heater channel

drilling out old spot welds. 


This is the new heater channel end piece.


Still more heater channel spot welds to drill out.


Drilled out heater channel spot welds. Notice the weld around
the heater pipe, cut that out with a grinder
.


Pig iron welded in as support brackets. Heater channel is gone.


Support vertically and horizontally


Once the spot welds are drilled out, the metal separates easily;
Hopefully.


This is an amazing tool for cutting out spot welds:


\


Once you cut out the spot welds, use this tool to separate the metal sections:

Friday, May 8, 2015

Painting Dad's Beetle

My dad invited me over to help him paint his beetle. I assisted with keeping the air hose out of the way and off the fresh paint and learned in the process. It's one thing to watch Youtube videos, but  quite another to see, smell, hear and feel the process.

  • See:
    • How the paint goes on-how much overlap, how to set the air/paint mix
    • How to mix the paint, thinner and hardener, and how often to do so
    • Paint spray linger in the air and vent out of the garage-It doesn't actually "get all over everything"
  • Smell the fumes and remember to seal the respirator better
  • Hear:
    • The air compressor
    • The gun spray
  • Feel:
    • The weight of the paint gun
    • The air hose
    • The heat and realize your limitations and strengths

Awesome job dad.


Thanks for letting me help. Now I can plan the logistics of painting my own car.

Getting to the Metal; Paint is Off


I’ve managed to strip almost every bit of paint from the beetle. After reviewing many videos on Youtube, I decided to go back to chemicals to remove the paint. The grinder is just too exhausting.

For the task I've used a few gallons of Klean-Strip Aircraft Paint Remover. The new sheet metal that came with a protective coating were simple. Just put on aircraft paint remover and scrub off with a green pad or other coarse pad such as Brillo. The fenders, body and anything with 40 years of old paint on top of old paint required multiple applications.


The 1969 VW Beetle had about 4 different colors from shades of green, blue, and red. For the fenders and doors, I eventually needed a grinder with wire brush to get of the mounds of body putty. These body fillers were used primarily to fill in dents that I could easily pound out with my Wilmar Hammer and Dolly set. 

.That’s the benefit of a total vehicle tear down. I can actually get to all areas and not worry about taping off areas or messing anything up. Some of the body filler covered torn metal.

I used my new found welding skill to weld over any torn areas. The grinding skill I picked up helped smooth out the welds.
Fenders were once green, and blue, and red.....


After removing paint, had to grind putty.

Holes in door to be repaired.


Another tear to weld

A big tear in the fender

After welding and grinding. Nice and smooth